SSL/TLS Certificates
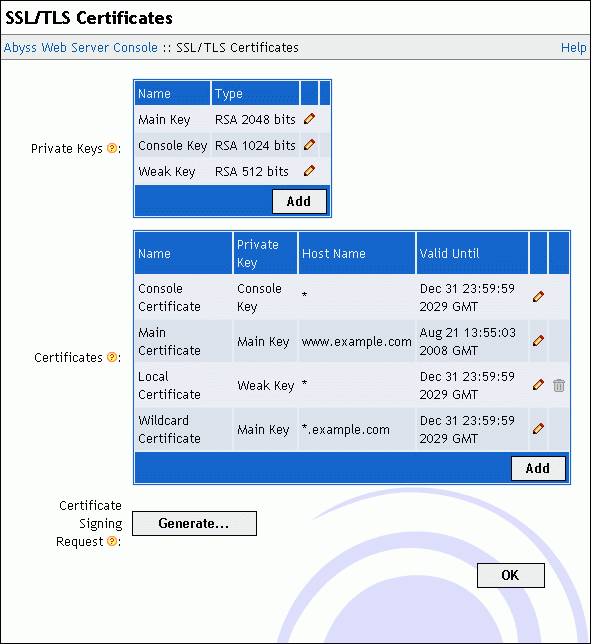
Open the console and select SSL/TLS Configuration to display the SSL/TLS certificates management interface. With it, you can:
Create and manage private keys.
Create self-signed certificates.
Add certificates signed by certification authorities.
Generate certificate signing requests (CSR).
Declare accounts to automate fetching certificates from certification authorities which support the ACME protocol.
Overview
SSL/TLS is a suite of communication protocols which encrypt data exchanged between a server and a client. It is used to securely transfer HTTP requests and responses on the network. SSL/TLS helps prevent communication spying and data sniffing.
To secure one of your hosts or the console with SSL/TLS, you first need to generate a private key. A private key should never be disclosed to a thrid party as it is used to cipher (i.e. encode) transferred data.
SSL/TLS requires also that the server makes its real identity available to the client by sending a certificate as soon as a connection is established between both of them. A certificate contains information about the certificate holder. If you intend to host a business site or a site where sensitive data is expected to be gathered or displayed, we strongly recommend that the certificate is signed by an independent certification authority which will check the holder information. A certificate that is not signed by a certification authority will work but the visitors' browsers will always display a warning message and invite them to confirm that they trust your self-signed certificate.
To sign a certificate by a certification authority, you have to create a CSR (Certificate Signing Request). A CSR is generated by choosing a private key and by entering your information. Once the CSR generated, you will have to send it to a certification authority which will do the necessary to check your information and to generate a signed certificate. Note that only the CSR has to be sent to the certification authority; the private key used to generate it should never be sent to them. When you receive the signed certificate, all you have to do is to enter it in Abyss Web Server console to start using it.
Generating a private key
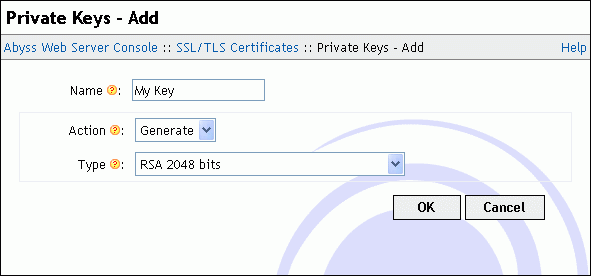
To create a new private key, press Add in the Private Keys table. In the displayed dialog, choose a distinctive name for the key and enter it in the Name field. Set Action to Generate and select the key type using the dropdown menu Type. When you press OK, the private key generation starts. It can take from a second to a minute depending on your computer speed and the type of the key you have chosen.
Importing a private key
If you already have a private key and want to use it in Abyss Web Server, press Add in the Private Keys table. In the displayed dialog, choose a distinctive name for the key and enter it in the Name field. Set Action to Import and copy the private key text contents in the Key Contents text area. Note that a private key stored in a file using the PEM encoding can be opened with any text editor and its contents copied then pasted in Key Contents to import it.
Generating a CSR
To obtain a certificate signed by a certification authority, press Generate in front of Certificate Signing Request. In the displayed dialog, choose a private key that the certificate will be based on. Next fill the listed fields with your information. Note that you must enter accurate information as most certification authorities will verify them before issuing the signed certificate. Keep the Secure Hash Algorithm to its default unless instructed by your certification authority to use a specific signature algorithm or need to interoperate with old clients which only understand SHA1 (deprecated as of 2015 and planned to be phased out by most browsers by 2016.) Press OK when you are done. The console will then display the CSR contents in a text area. Depending on your certification authority, you may have to send it, copy it in an online form, or put it in a text file and forward it to them. We strongly recommend that you check with your certification authority about the best way to provide them with the CSR.
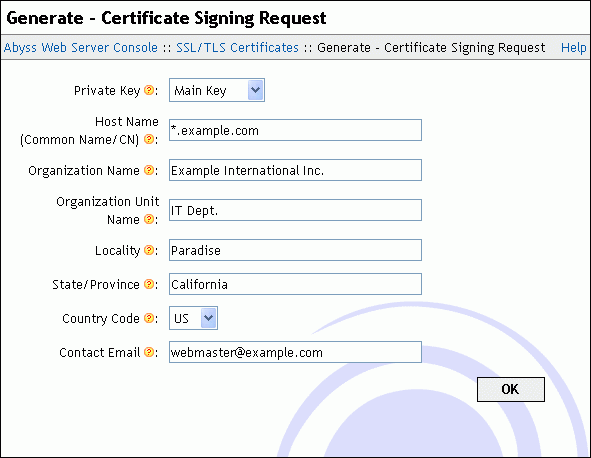
How to properly fill the Host name (Common Name) field?: The Host name (Common Name) must be filled with the name of the host which will use the certificate. If the host name is www.example.com, that field should contain www.example.com and not only example.com.
Some certification authorities support wildcard certificates. In such a case, you can enter in that field *.example.com which will create a CSR for a certificate that will be valid for www.example.com, test.example.com, or mail.example.com. However that certificate will not be valid for example.com or test.mail.example.com.
Some certification authorities may also support certificates with more than one host name. To generate a CSR for such a certification authority, enter in the Host name (Common Name) all the host names separated with spaces. For example, if a certificate is to be associated with both test.example.com and mail.example.com, enter test.example.com mail.example.com.
About the "Server Type" question: Some certification authorities will ask you about your server type. This information is mainly used for statistical purposes and makes no difference on the final signed certificate they will deliver. If you do not find Abyss Web Server on their list, select Other Web Server or Other. If no such choices are available, you can select OpenSSL or OpenSSL-based server. Again if no such choices are available, you can safely select Apache or ModSSL as our SSL/TLS implementation is based on OpenSSL which is also used by Apache and ModSSL.
IDN (International Domain Names): Abyss Web Server accepts IDN (International Domain Names) in the Host name (Common Name) field. It will recognize them and convert them to the proper format for use inside a CSR.
Adding a signed certificate
To import a certificate signed by a certification authority into Abyss Web Server, press Add in the Certificate Store table. In the displayed dialog, choose a name for the new certificate and enter it in Name. Set Private Key to the private key that the certificate is based on: It is the same private key that you selected when generating the CSR associated with that certificate. Next set Type to Signed by a Certification Authority (CA). Enter the main certificate in Main Certificate. If it was delivered in a file, open it with a text editor and copy its contents to Main Certificate.
If the certification authority provided you with additional certificates that are necessary to establish the trust chain, they must be entered in the Intermediate Certificates. If more than a single intermediate certificate is available, enter their contents one after the other in that field.
The last field CA Root Certificate must be filled with the CA (Certification Authority) or root certificate if available. Press OK to validate the new certificate.
Creating a self-signed certificate
If your use of SSL is limited or if you do not mind having your visitors get a warning from their browser about your certificate each time they access your site, you can generate a self-signed certificate using the console.
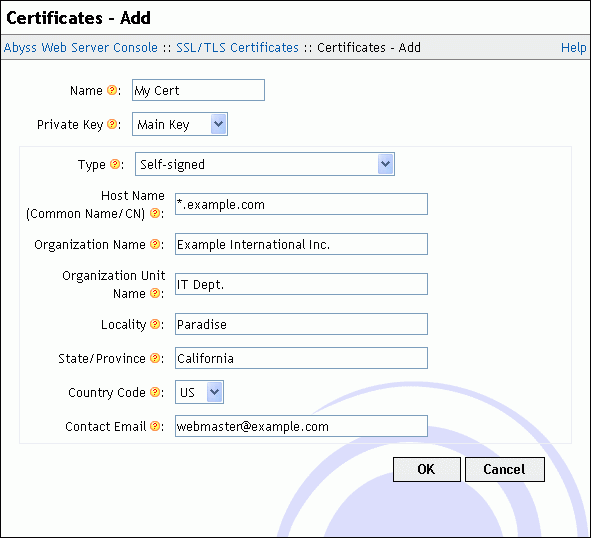
To generate a self-signed certificate, press Add in the Certificate Store table. In the displayed dialog, choose a name for the new certificate and enter it in Name. Use Private Key to select the private key that the certificate will be based on. Next set Type to Self-Signed Certificate. Fill the information fields with your details. Keep the Secure Hash Algorithm to its default unless you need to test a specific signature algorithm or need to interoperate with old clients which understand only SHA1. Finally press OK to create the certificate.
Self-signed certificates security: A site using a self-signed certificate offers the same security as a site using a certificate signed by a certification authority since the encryption is private key dependent only. But consider that self-signed certificates cannot be trusted by visitors who do not know you. So use them only for tests or for sites which access is limited and which visitors trust you (for example in an Intranet or for a family Web site).
Getting certificates from an ACME certification authority
The Automatic Certificate Management Environment (ACME) protocol automates the communication between a Web server and a certificate authority to fetch an install valid SSL/TLS certificates with no or very little user interaction.
ACME-Bot
ACME-Bot is an internal component of Abyss Web Server. It is responsible of interacting with ACME compliant certification authorities such as Let's Encrypt which delivers free SSL/TLS certificates trusted by all modern browsers and HTTPS clients. ACME-Bot installs obtained certificates and renews those near expiry. It also handles HTTP-01 challenges to prove domain ownership: For that end, ACME-Bot may create a responder host listening on port 80 (by default) to reply to ACME certification authorities challenges in an automatic way.
ACME-Bot current status and on-going activities are viewed by pressing View... in the ACME-Bot Status field. The console may also display notification about ACME-Bot errors or request your assistance to validate the ownership of a domain name for which a certificate will be delivered.
Creating an ACME account
To enable automatic generation of certificates from one or more hosts in Abyss Web Server, you should first create a new private key as detailed in "Generating a private key". Next, press Edit... in the ACME-Bot Parameters field. Then press Add in the ACME Accounts table. In the displayed dialog, choose a name for the new account and enter it in Name.
Use the Directory URL field to select the entry point of the ACME certification authority. Abyss Web Server comes preloaded with the default entry points for both regular and staging variants of Let's Encrypt (Version 2). Staging should only be used for tests as the certificates it generates are self-signed by the certification authority and not trusted by any browser.
Use Private Key to select the private key that the account will use when communicating with the ACME certification authority. It is highly recommended that this key is exclusively used for that purpose and not shared with another certificate you have.
Fill Contact Email with your email address which will be used to create the account with the ACME certification authority.
Once all the fields are filled, press OK to save the account information. This new account can later be used in any host to have the ACME-Bot automatically order, ftech, and install certificates.
Fine-tuning ACME-Bot
The dialog ACME-Bot Parameters exposes other fields meant for configuring certificate renewal and installation as well as debugging communication with ACME certification authorities:
Renew ACME certificates before their expiry by: Controls the time by which ACME-Bot should place an order for the renewal of a certificate fetched from an ACME certification authority.
Force a server restart to use a new ACME certificate before the old one's expiry by: Controls the time by which ACME-Bot should force a restart to have the server load a new certificate fetched from an ACME certification authority.
Retry failed orders due to network errors every: The duration ACME-Bot waits before retrying an operation after a network failure.
Log File: The path of the log file for ACME-Bot. If it is relative, it is considered as a subpath of the server root. If empty, logging is disabled.
Debugging Level: The type of information ACME-Bot should log. It should be set to Errors unless you are debugging a problem with an ACME certification authority or trying to have more information about the internals of the ACME protocol and ACME-Bot implementation.