Configuring a host
To open the configuration dialog of a host, go to the main console dialog and press the Configure button located on the same line as the host name in the Hosts dialog.
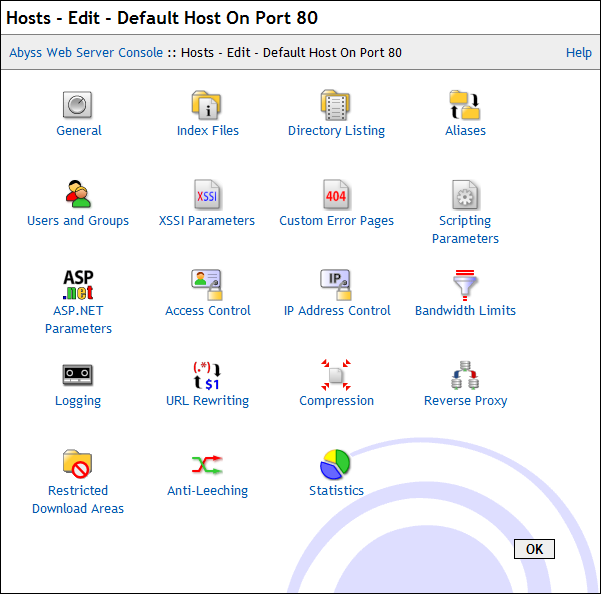
The following subsections describe all the host configuration options.
General
The General dialog contains the general configuration parameters of a host.

This dialog has the following elements:
Documents Path: The path of the web site files. If it is a relative path then it is considered as a subpath of the server root.
Protocol: Set it to HTTP to configure the host to use normal non-secure connections. To have the host serve content over secure connections only using SSL/TLS, set it to HTTPS. The host can be configured to serve content on both secure and non-secure connections by setting Protocol to HTTP+HTTPS. In such a situation, you can configure some virtual paths to be accessible on secure connections only by adding them to the Exclusively Serve On HTTPS table.
HTTP Port: The port on which the host waits for HTTP connections. Its default value is 80. This field is not available if the Protocol is set to HTTPS only.
HTTPS Port: The port on which the host waits for secure HTTPS connections. Its default value is 443. This field is not available if the Protocol is set to HTTP only.
Certificate Type: The origin of the certificate that is used for secure connections with the current host. The certificate can be retrieved from the certificate store (a self-signed certificate or a certificate from a certificate authority) or generated by an ACME server using a declared ACME account. This field is not available if the Protocol is set to HTTP only.
Certificate: The name of certificate from the certificate store that is used for secure connections with the current host. Note that the certificate's Host Name (Common Name) should be equal to or match with the names associated with the current host. Otherwise, visitors' browsers will report a warning about mismatched names on every access to the host. This field is available only if Certificate Type is set to From certificate store.
ACME Account: The name of the ACME account which ACME-Bot uses to request or renew a certificate for secure connections with the current host. This field is available if Certificate Type is set to From ACME account.
Host Names: This table contains the names associated with the current host. If the table is empty, the host is not associated with a specific name and will answer any request that reaches it on the configured port. A host can also have one or more names. Names may contain non-Latin characters ans Abyss Web Server supports International Domain Names (IDN) natively. A host name in this table can also be a pattern such as *.mysite.com. Refer to the "Patterns Format" appendix for more information about patterns.
Advanced Parameters: Press Edit... to open the advanced parameters dialog which contains the following fields:
Bind to IP Address: The IP address of the network interface that the host should listen on. When empty or set to *, the host listens for incoming connections on all available network interfaces (which is the default and the recommended setting.)
SSL/TLS Parameters: Detailed parameters of the SSL/TLS secure layer are accessible by pressing Edit....
In the displayed dialog, SNI support (which is enabled by default) can be disabled. SNI stands for Server Name Indication and is an extension to the SSL/TLS protocol to allow virtual hosting on SSL/TLS. The original SSL protocol limited each pair of IP address and port to have a single certificate. This prevented HTTPS ports sharing. With SNI, cetificate negotiation became possible and legacy SSL restrictions are now lifted.
It is also possible to let the host accept clear text http:// requests on a port that was configured for https://. This can be useful to redirect clients which use the wrong protocol on the right port. The feature is controlled by the value of Accept receiving clear text HTTP/1.x requests on SSL/TLS port. It is disabled by default for normal hosts.
The displayed dialog allows also changing the SSL/TLS profile. But it is highly recommended to let it set to its default and recommended value.
If the profile is set to Modern, only strong ciphers and TLS 1.3 will be accepted. Selecting this profile will restrict access to modern browsers and clients which support TLS 1.3.
If the profile is set to Standard, only modern ciphers with no known issues and both TLS 1.2 and 1.3 will be accepted. The Standard profile offers a good balance between security and reach. It will only disable access for legacy browsers and clients including Internet Explorer 10 and its previous versions which are already deprecated.
If you set the profile to Custom, it becomes possible to select the accepted protocols and configure the Ciphers parameter to select the ciphers that the server can accept to use when negotiating with a browser establishing a HTTPS connection to the console.
When the profile is set to Strong, no weak cipher (any cipher with a key length strictly less than 128 bits) will be used. But this can restrict access from old browsers which do not support modern and strong ciphers.
For custom ciphers specification, set this parameter to Custom Specification and fill the displayed text field with a string conforming to the OpenSSL Ciphers List Format.
The ACME Parameters are also available to select the validation modes of the HTTP-01 and DNS-01 challenges and to allow storing a copy of an ACME-obtained certificate in a specified file for sharing with an external program. The HTTP-01 challenge is by default set to Automatic validation. If for some reason, port 80 cannot be accessed by the external ACME server to validate the ownership of a domain name, it is possible to set the challenge mode to Automatic validation with custom configuration to fine tune the binding IP address as well as the port used for validation (although that port has to be accessed externally as port 80 - port-forwarding on your router should be properly configured in such a case.) Both HTTP-01 and DNS-01 challenges support a manual validation mode where it is possible to perform the validation by following the ACME-Bot instructions on its status page on the console. HTTP-01 or DNS-01 challenges can also be disabled.
HTTP/2 Parameters: HTTP/2 support in the current host can be configured by pressing Edit.... The displayed dialog has the following fields:
Disabled: A switch to disable HTTP/2 support in the current host. Note that even though this box is unchecked, the server can still not accept HTTP/2 connections because HTTP/2 support is disabled at the global level or because the current host is not configured to accept HTTPS secure connections.
HTTP/1.1 Required: If a HTTP/2 stream carries a request which path matches one of the virtual paths listed in this table, it is aborted with error code HTTP1_1_REQUIRED. This forces the browser to retry the request with HTTP/1.1 and to no more use HTTP/2 for that host during the rest of the session.
By default, this table contains a pattern which matches with the naming convention of legacy NPH (Non Parsed Headers) scripts. For more details, refer to "CGI Internals".
Disable Download Resuming for: Download resuming (through the Range HTTP header) is disabled for requests which path matches one of the virtual paths listed in this table.
Disable Caching Negotiation for: Caching negotiation with the browser (through the If-modified HTTP headers) is disabled for requests which path matches one of the virtual paths listed in this table.
Custom HTTP Headers: Use this table to declare custom HTTP headers that will be included in the server responses. A custom header is added when the request's virtual path matches with the value or the pattern of its associated Virtual Path field. See the "Patterns Format" appendix for more information about patterns. The HTTP headers Server, Connection, Keep-Alive, Transfer-Encoding, and Content-Length cannot be customized.
Exclusively Serve On HTTPS: If a request's virtual path matches with one of the paths or the patterns declared in that table, and if the request was received on a non-secure (HTTP) connection, the server generates a redirection to the same virtual path but using HTTPS to force it to be served on a secure connection. The Exclusively Serve On HTTPS table is available only when the current host's Protocol is set to HTTP+HTTPS.
Request Body Restrictions: Restriction on the request body (sent by client for HTTP POST requests for example) are applied for requests which path matches one of the virtual paths listed in this table. Each of these virtual paths could be associated with a restriction on the total length of request body (controlled through the Maximum Length parameter.) Similarly, request bodies which are sent by the client using chunked encoding could be automatically dechunked and served as normal request bodies to scripts and Web applications which are not compatible with chunked encoding. Note that CGI and FastCGI compatible scripts and Web applications need dechunking as these specification do not support chunked encoding. The parameter Dechunk controls the support of that feature for a given virtual path and Maximum Dechunk Length defines the maximum size of the dechunk buffer. Since dechunking requires buffering in the memory, do not set this limit too high especially on busy servers.
File Expiration Times: If the virtual path of a request matches with one of the paths or the patterns declared in this table and if it refers to a static file, the MIME type of the file is compared to the one in the matching rule. If it matches, an Expire HTTP header is injected in the reply. The expiration date is set using the value of the Time Delta field relatively to the Time Base which is either the file's last modification date or the current date (now.)
Do not serve file requests with Pathinfo in: By default, if a virtual path such as /photos/2014/house.jpg refers to an actual static file or SSI page, a request for virtual path /photos/2014/house.jpg/extra/goes/here will be successful and will serve the same content as the previous and shorter virtual path. /extra/goes/here is called the path information (or simply Pathinfo.)
If the virtual path of a request matches with one of the paths or the patterns declared in this table, if it refers to a static or SSI file, and if path information is present, the server replies with an error which status code is 404 (Not found) instead of serving the file.
Index Files
When a browser asks for a URL that does not contain a filename, the server checks for the existence of each index file in the mapped directory. If none is found and automatic directory indexing is enabled, a directory listing is generated and sent to the browser. Otherwise, an error is reported.
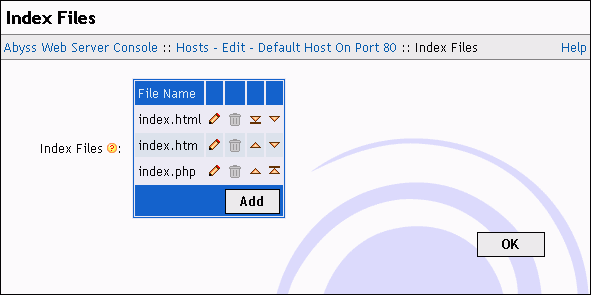
To edit, remove or add index filenames, use the Index Files table in the Index Files dialog.
Example 5-1. index.htm and index.html as index files
Assume that index.html and index.htm are set as index filenames. If a browser asks for http://<your host name>:<host port>/hello/, the server checks if <documents path>/hello/index.html exists. If not, it checks if <documents path>/hello/index.htm exists. If so, it is sent to the browser. If not, a listing of the directory <documents path>/hello/ is generated and sent to the browser if automatic directory indexing is enabled. If it is disabled, the server replies with a forbidden error message.
Directory Listing
When a browser asks for a URL that does not contain a filename, and if the server does not find an index file in the mapped directory, it generates a directory listing.
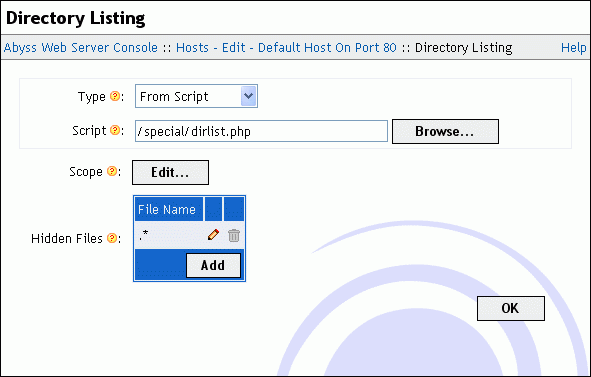
This dialog contains the following elements:
Type: The type of listing that should be generated. It can be:
Disabled: Disables directory listing. In this case, the server generates error 403 instead of a listing.
Standard Listing: A listing based on a standard and fixed basic template is generated.
From Template: A listing is generated according to the configured custom template. See the "Custom Directory Listings" chapter for detailed information about creating custom templates.
From Script: A listing is generated by the script configured in the Script field. Refer to the "Custom Directory Listings" chapter for detailed information about creating directory listing scripts.
Scope: Press Edit... to configure the virtual paths where directory listing is permitted. The displayed dialog has the following items:
Order: The order that the server follows to check if directory listing is permitted for a virtual path. If it is set to Allow/Deny, listing is denied by default and is allowed only if the virtual path is in the Allow for list and is not in the Deny for list. If it is set to Deny/Allow, listing is allowed by default and is denied only if the virtual path is in the Deny for list and is not in the Allow for list.
Allow for: The list of virtual paths for which directory listing is allowed. The table can contain also path patterns. See the "Patterns Format" appendix for more information about patterns.
Deny for: The list of virtual paths for which directory listing is denied. The table can contain also path patterns. See the "Patterns Format" appendix for more information about patterns.
Hidden Files: The file names that are equal or that match with the listed file name patterns in this table are not included in the directory listings. See the "Patterns Format" appendix for more information about patterns. This table should only contain file names with no path references.
Aliases
Select Aliases in the host configuration menu to display the aliases table.
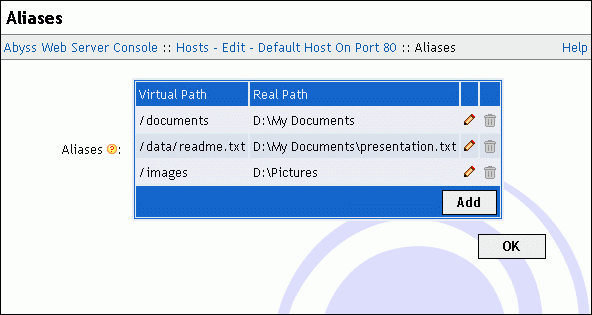
If a URL matches an alias' virtual path, the web server maps it to the alias' associated real path.
Use the displayed table to edit, remove or add aliases.
Example 5-2. Relative real path
Assume that there exists an alias which virtual path is /images and which real path is web/artwork. If a browser asks for http://<your host name>:<host port>/images/logo.jpg, the server maps the requested URL to the file <server root>/web/artwork/logo.jpg. The <server root> is added because the real path was relative.
Example 5-3. Absolute real path
Assume now that there exists an alias which virtual path is /images and which real path is d:\web\artwork. If a browser asks for http://<your host name>:<host port>/images/logo.jpg, the server maps the requested URL to the file d:\web\artwork\logo.jpg. The difference with the previous example is that the real path is absolute and not relative.
XSSI Parameters
To configure XSSI (eXtended Server Side Includes), select XSSI Parameters in the host configuration menu.
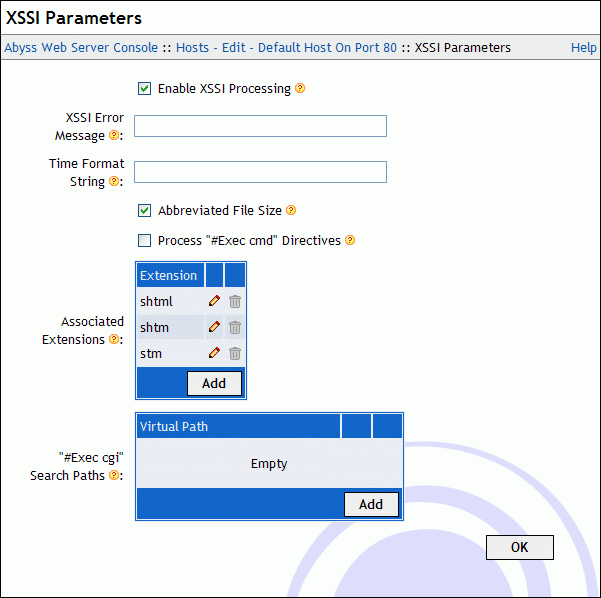
This dialog includes the following fields:
XSSI Error Message: The default error message that the server inserts when an error is detected while processing an XSSI directive. If empty, an accurate error description with debugging information is generated.
Time Format String: The default time format string that the server uses to display times while processing XSSI directives. If empty, the string %A, %d-%b-%Y %H:%M:%S %Z is used. For the complete reference of the time format string, read the description of <!-- #config timefmt="time_format" --> directive in "eXtended Server Side Includes" chapter.
Abbreviated File Size: The default way to display file sizes. If it is checked, file sizes are displayed in KB or MB. Otherwise, they are displayed in bytes.
Process "#Exec cmd" Directives: Enable/disable the execution of shell commands in XSSI.
Associated Extensions: If a file name extension matches with one of these extensions or extensions patterns, it is processed as an XSSI file. Read the "Patterns Format" appendix for more information about patterns. By default, the server is configured to process XSSI directives in files which extensions are shtml, shtm, or stm.
"#Exec cgi" Search Paths: If the argument of a #exec cgi directive is a relative path, the server will try to locate the file inside the directory containing the currently processed XSSI file. If it is not found there, it will search for it inside the virtual paths listed in '#exec cgi' Search Paths.
For more information about XSSI, refer to the "eXtended Server Side Includes" chapter.
Users and Groups
Select Users and Groups in the host configuration menu to display the users and groups tables.
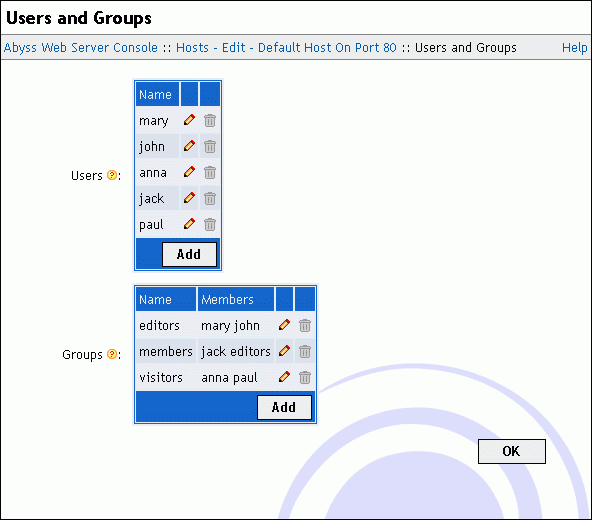
Use the displayed tables to edit, remove or add users and groups.
A user is defined by its name and its password. The name can be configured as case-insensitive. In such a case, the user can authenticate by entering the name while replacing any lowercase characters a...z with their uppercase counterparts A...Z and vice versa.
A group is defined by its name and its members which can be users and other groups.
Note: The console hides automatically groups that can lead to circular references when editing a group.
Custom Error Pages
With Abyss Web Server, you can override the standard error pages and replace them with yours. To do so, select Custom Error Pages in the host configuration menu.
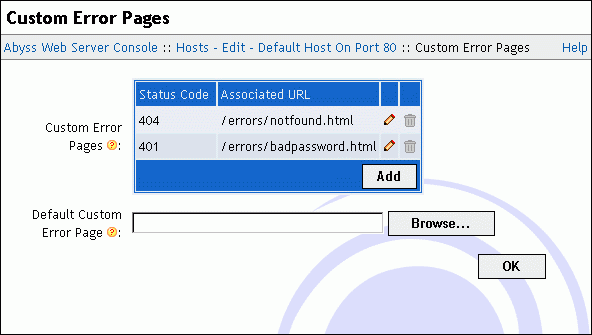
This dialog includes the following elements:
Custom Error Pages: This table contains the customized errors and their associated URLs.
Default Custom Error Page: The URL used when an error which code is not listed in the Custom Error Pages table occurs. If empty, Abyss Web Server generates automatically a standard error page.
An error URL can be:
Local: If it begins with a slash /, the URL is local to the web server.
Global: If it begins with http:// or https://, the URL is global and the web server informs the browser to redirect to that URL when an error occurs.
Note: It is only relevant to set 4xx and 5xx error codes. Other error codes are handled internally in the web server and do not lead to displaying an error page.
Note: When using a local URL that is a CGI script or an XSSI page as a custom error page, the server operates an internal redirection and adds to the custom error page's environment variables all the faulty request environment variables prefixed with REDIRECT_. It adds also the special variables REDIRECT_STATUS and REDIRECT_STATUS_CODE which contain the status code of the faulty request. For more information, read "CGI environment variables" section in "CGI, FastCGI, and ISAPI" chapter.
Scripting Parameters
To configure CGI, FastCGI, ISAPI, and scripts execution, select Scripting Parameters in the host configuration menu.
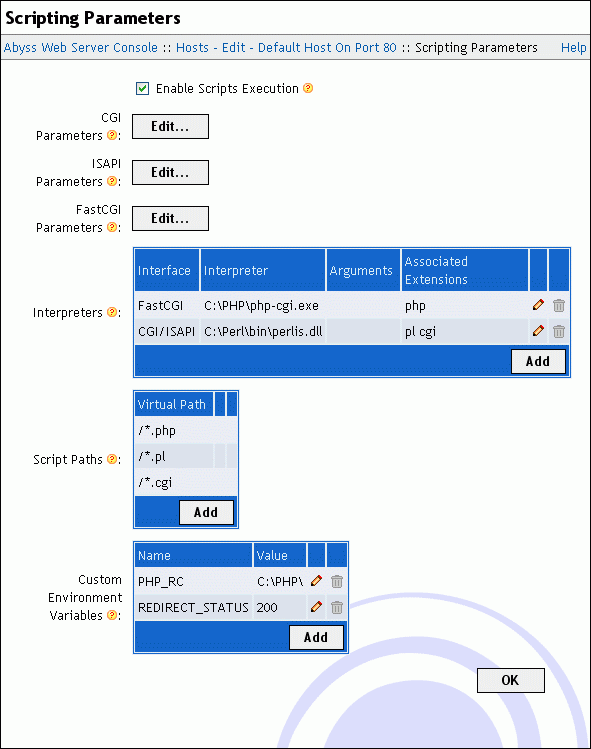
This dialog includes the following fields:
Enable Scripts Execution: Enable/disable CGI, FastCGI, ISAPI, and scripts execution.
CGI Parameters: Press Edit... to access the CGI parameters dialog which contains the following elements:
Error File: The path of the file where CGI scripts write error messages. You can leave it empty if you do not want to trace CGI scripts' errors.
I/O Timeout: How long (in seconds) the server should wait for a CGI script or application to deliver content before aborting it.
Resolve Interpreter from the Windows Registry: Use the Windows Registry to automatically find the interpreter which can run a CGI script.
This parameter should be used very carefully as it can make the server report Error 500 (Internal Server Error) for normal documents. For example, if a HTML file is in one of the CGI Paths (or matches with one of the CGI Paths patterns), and if this parameter is checked, the server asks the Windows Registry about the executable that is normally used to open HTML files (in a similar fashion to what does Windows Explorer to know what application to launch when you double-click on a document icon). The Windows Registry gives back your browser executable path and Abyss Web Server runs the HTML file as a CGI Script with this browser as its interpreter. But after launching it, Abyss Web Server understands that this executable is not a valid CGI Interpreter. So it aborts the executable and reports Error 500.
Resolve Interpreter using the #! Line: Read the first line of the CGI script. If it begins with #!, the rest of the line is considered as the path to the script's interpreter.
ISAPI Parameters: Press Edit... to access the ISAPI parameters dialog which contains the following elements:
Error File: The path of the file where ISAPI extensions write error messages and where the server logs ISAPI activity when Debugging Level is set to a value other than None. You can leave it empty if you do not want to trace ISAPI errors.
Debugging Level: The type of information Abyss Web Server should log when an ISAPI is invoked. It should be set the None unless you are developing or debugging an ISAPI extension.
ISAPI Filename Extensions: This table contains the file name extensions that helps the server recognize if a file is an ISAPI or not. It is filled with dll by default. This table is used for example to know if a declared interpreter is an ISAPI extension or not.
FastCGI Parameters: Press Edit... to access the FastCGI parameters dialog which contains the following elements:
Error File: The path of the file where FastCGI executables and interpreters write error messages and where the server logs their activity when Debugging Level is set to a value other than None. You can leave it empty if you do not want to trace FastCGI errors.
Debugging Level: The type of information Abyss Web Server should log when a FastCGI executable or interpreter is running.
I/O Timeout: How long (in seconds) the server should wait for a FastCGI process to deliver content before aborting the connection with it and reporting an error.
FastCGI Processes Timeout: How long (in seconds) the server should let an unused FastCGI process wait before aborting it.
The dialog contains also the following tables:
Interpreters: The server uses this table to know which interpreter to use to execute a script. The choice is based on the script's file name extension: an interpreter runs a script if the extension of that script matches with one of the associated extensions or extensions patterns of the interpreter.
Each interpreter is defined by its:
Interface: It has to be set to FastCGI (Local - Pipes) or FastCGI (Local - TCP/IP Sockets) if the interpreter supports FastCGI and its executable is available on the computer where the Web server is installed. If you have a standalone or remote FastCGI server, set it to FastCGI (Remote - Pipes) or FastCGI (Remote - TCP/IP Sockets) depending on the type of network protocol it supports. Otherwise, Interface should be set to CGI/ISAPI. Note that for most FastCGI compliant interpreters, you can either choose FastCGI (Local - Pipes) or FastCGI (Local - TCP/IP Sockets) with no noticeable difference as both modes provide comparable performances. But some FastCGI interpreters such as PHP 5.1.3 and later only support a single mode of operation. So if an interpreter fails to work in a given mode, select the other and retry. You can also refer to Aprelium's Web site to know which mode is supported by that interpreter. Note also that both FastCGI (Local - Pipes) and FastCGI (Remote - Pipes) are not available on Windows 95, 98, and ME.
Interpreter: The path of the FastCGI/CGI executable or the ISAPI extension (not available if Interface is set to FastCGI (Remote - Pipes) or FastCGI (Remote - TCP/IP Sockets)).
Arguments: The additional arguments that are used to run a FastCGI/CGI executable (not available if Interface is set to FastCGI (Remote - Pipes) or FastCGI (Remote - TCP/IP Sockets)). These arguments are ignored if the interpreter is an ISAPI extension. Any occurrence of %1 or $1 in the arguments is replaced by the script file name when running the FastCGI/CGI interpreter.
Advanced Parameters: If Interface is set to FastCGI (Local - Pipes) or FastCGI (Local - TCP/IP Sockets), press Edit... to access the advanced parameters dialog which contains the following elements:
Minimum Processes Count: The minimum number of processes of the FastCGI interpreter that the Web server will maintain available and running. If this field is empty, no processes are maintained running and new ones are created on demand.
Maximum Processes Count: The maximum number of processes of the FastCGI interpreter that the Web server will allow to be running at the same time. If this field is empty, no maximum limit is imposed.
Conservative Behavior Process Count Threshold: When the number of processes of the FastCGI interpreter reaches this parameter's value, new processes are not immediately created on demand: the Web server will wait for some amount of time for an already running process to be ready. If no process is ready after that wait, a new one is created. If empty, no such soft limit exists.
Conservative Behavior Polling Interval: The amount of time in milliseconds the Web server waits for before creating a new process for the FastCGI interpreter if the Conservative Behavior Process Count Threshold is reached and no process becomes available. If empty, it defaults to 1000 milliseconds (1 second.)
Request Count Before Process Recycling: When a given process of the current FastCGI interpreter has processed as many requests as indicated by this parameter, it is gracefully shut down and restarted. An Unlimited value means that no recycling will ever occur. The value of this parameter can be set automatically, based on an environment variable or directly via a constant set in the console. The automatic mode is the default: if the interpreter is PHP (i.e., its declared path contains the substring php), it will use the value found in the special environment variable PHP_FCGI_MAX_REQUESTS; if that variable is not declared or is empty, it will use 500 as the default. If the interpreter is not PHP, the value is considered unlimited.
Maximum Process Age Before Recycling: When a given process of the current FastCGI interpreter has been running for the duration indicated by this parameter, it is gracefully shut down and restarted. No recycling will ever occur if this parameter is set to Unlimited.
Recycle when the following file changes: If this field is not empty, any change to the specified file will trigger the the restart of all the processes associated with the current FastCGI interpreter.
Pipe Path: The full path of the pipe that will be used to communicate with the interpreter if Interface is set to FastCGI (Remote - Pipes). If the FastCGI server is running locally, its pipe path should be of the form \\.\pipe\name where name is the name of the pipe. If the FastCGI server is available on another computer on the LAN, its pipe path should be of the form \\computer\pipe\name where computer is the name of the computer hosting the FastCGI server.
Remote Server IP Address: The IP address of the computer that is hosting the interpreter's FastCGI server (available only if Interface is set to FastCGI (Remote - TCP/IP Sockets)).
Port: The number of the port the interpreter's FastCGI server is listening on (available only if Interface is set to FastCGI (Remote - TCP/IP Sockets)).
Check for file existence before execution: If enabled, the server will report an error when the script file requested is not physically available on the disk. If this option is disabled, the server will launch the interpreter associated with the requested script without even if its file does not exist on the disk. It is then up to the interpreter to report an error or to act accordingly.
Type: Some interpreters are not fully conforming to the FastCGI/CGI or the ISAPI specifications. By setting this parameter to the correct value, the server activates a special workaround mode to support them. PHP interpreters (both FastCGI/CGI and ISAPI version) and Shorthand ISAPI should have their Type set to PHP Style. ActiveState ActivePerl ISAPI should have its Type set to ActivePerl ISAPI. For any other interpreter, set Type to Standard.
Associated Extensions: The list of file name extensions that are to be handled by the current interpreter. You can also define an extension pattern. Refer to the "Patterns Format" appendix for more information about patterns. To associate more than a single extension with an interpreter, press Add... for every extension to declare it.
When adding or editing an interpreter, letting Use the associated extensions to automatically update the Script Paths checked makes Abyss Web Server automatically add/remove the pattern /*.ext in the Script Paths table for every added/removed extension ext in the Associated Extensions list.
Script Paths: Only files that are in one of the Script Paths or their subpaths, or that match with one of the Script Paths patterns can be processed as scripts. These paths are virtual paths. See the "Patterns Format" appendix for more information about patterns. An executable located in each path or its subpaths is considered as CGI or FastCGI applications according to the setting of Interface type of executables in this path of the corresponding script path. If X-SendFile Support is enabled, scripts or executables can emit an X-Sendfile CGI header which value will be used to serve a static file relative to the Files Root Path. For more details about that feature, refer to the "X-Sendfile Support" section. It is also possible to enable or disable bufering the output of scripts or executables in that path by setting the value of Output Buffer Size.
Custom Environment Variables: This table contains the variables you want to add to the execution environment of the FastCGI/CGI interpreters and scripts. Each variable is defined by its name and its value.
For more information about scripts, see "CGI, FastCGI, and ISAPI" chapter.
ASP.NET Parameters
Select ASP.NET Parameters in the host configuration menu to display the ASP.NET applications table.

Abyss Web Server features genuine support for ASP.NET applications. If you do not see the ASP.NET Parameters icon in the host menu, it is probably because you have not installed ASP.NET support in Abyss Web Server. To remedy to that, launch the installer package again to upgrade your current setup of Abyss Web Server and ensure that the ASP.NET Support component is selected.
If you do not have a version of Microsoft .NET Framework 1.1 (or higher) correctly installed on your system, Abyss Web Server will report the problem and provide you with a link to install the missing system component.
Unlike other scripting languages and platforms, ASP.NET has the concept of application which is a set of files related to the same ASP.NET program. ASP.NET must know where each program is to be able to locate the configuration files of the application and to process it correctly.
If ASP.NET support is correctly set up and a recognized Microsoft .NET Framework version is installed, the ASP.NET Parameters dialog shows a table to edit, remove or add ASP.NET applications.
Each ASP.NET application is defined by the following parameters:
Virtual Path: The virtual path containing all the ASP.NET application files and subdirectories.
.NET Version: The version of .NET Framework that will be used to run the ASP.NET application.
Preload: If checked, the ASP.NET application is loaded during server startup. Otherwise, it is loaded on demand when the first request for it is received by the Web server.
Request Count Before Process Recycling: When the ASP.NET connector process (powering the particular .NET Version specified for the current ASP.NET application) has processed as many requests as indicated by this parameter, it is gracefully shut down and restarted. No recycling will ever occur if this parameter is set to Unlimited.
Maximum Process Age Before Recycling: When the ASP.NET connector process (powering the particular .NET Version specified for the current ASP.NET application) has been running for a period of time indicated by this parameter, it is gracefully shut down and restarted. A value of Unlimited for this parameter means that no recycling will ever occur.
Preload Type: If set to Standard, the ASP.NET application is preloaded by starting an ASP.NET connector process. To enable a full preload and possibly the warm-up of the ASP.NET application (by forcing an immediate compilation of its code behind files), Preload Type should be set to Internal HTTP HEAD request which simulates a first request at the server startup to force a full preload of the application and its components.
Preload Subpath: The value of that field is appended to the value of Virtual Path to build a URL that will be requested internally by the server when preloading the ASP.NET application. Most old ASP.NET applications require that field set to default.aspx. Modern ASP.NET applications (with routes, MVC or AJAX) can be started with no value for that field.
Isolated: By default, all ASP.NET applications that are run with Isolated not checked share the same .NET framework application domain.. When Isolated is checked, the ASP.NET application is loaded in its own .NET framework application domain.
Handling: This parameter defines the parts of the virtual path that should be served by the ASP.NET application. When set to All the subdirectory, all the virtual paths (even those which do not relate to actual files) will be forwarded to the ASP.NET application. This is the default setting and it is recommended for modern ASP.NET applications especially those taking advantage of routes, MVC or AJAX. If you want to delegate the processing of some specific files to the ASP.NET application and have the rest of them handled by the Web server for maximum performance, Handling should be set to Specific File Extensions. In such a case, the ASP.NET application will only process files which exist and which file name extension is listed in the Associated Extensions table.
Associated Extensions: Files inside the ASP.NET application virtual path which extensions are listed in this table are processed by the ASP.NET engine. Note that Associated Extensions is always filled with the full list of file name extensions that can be handled by the .NET version you have selected when defining the ASP.NET application. So it is rarely necessary to update this table.
Access Control
To restrict and manage the access to paths in your web site, select Access Control in the host configuration.
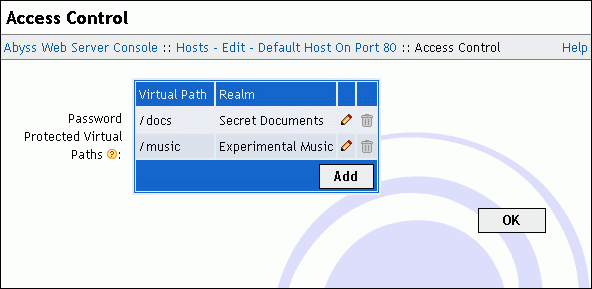
To edit, remove or add path access rules, use the displayed table.
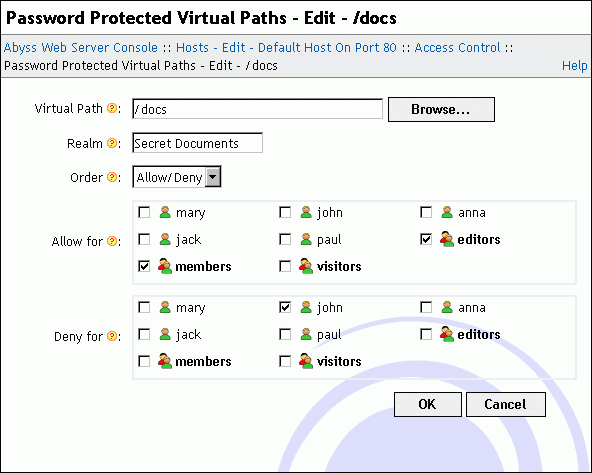
The path access edition dialog contains the following fields:
Virtual Path: The virtual path which contents' access is to be restricted. It must always begin with a slash /. This field accepts also path patterns. In that case, the access rule applies to any virtual path that matches with the specified pattern. Refer to the "Patterns Format" appendix for more information about patterns.
Realm: A short description of the path's contents. It is prompted to users by the browser when it asks them for credentials.
Order: The order that the server follows to check if access is granted to a user. If it is set to Allow/Deny, access is denied by default and is allowed only if the user is in the Allow for list and is not in the Deny for list. If it is set to Deny/Allow, access is allowed by default and is denied only if the user is in the Deny for list and is not in the Allow for list.
Allow for: The list of users and groups for whom access is allowed.
Deny for: The list of users and groups for whom access is denied.
Note: If Deny for list is empty and the order is Deny/Allow, access is granted to all declared users and groups.
IP Address Control
To restrict and manage the access to paths in your web site, select IP Address Control in the host configuration.
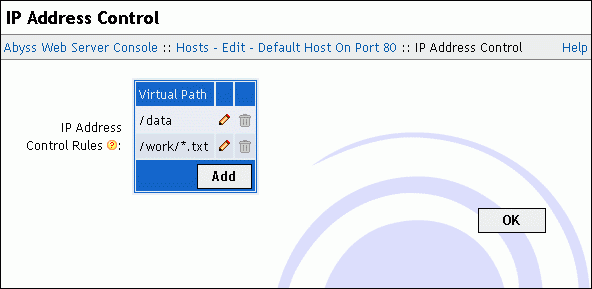
To edit, remove or add path IP Address Control rules, use the displayed table.
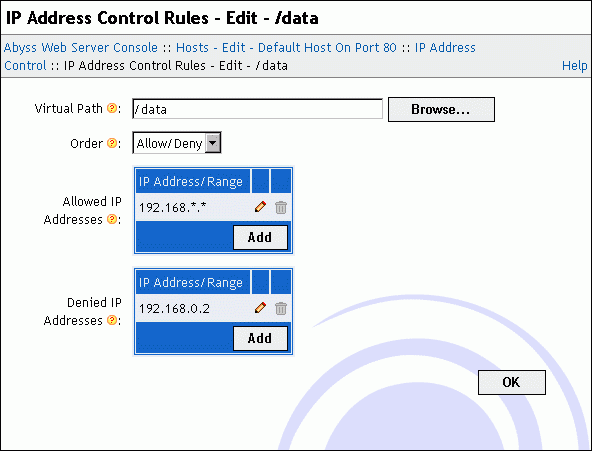
The IP address control rule edition dialog contains the following fields:
Virtual Path: The virtual path which contents' access is to be restricted. It must always begin with a slash /. This field accepts also path patterns. In that case, the access rule applies to any virtual path that matches with the specified pattern. Refer to the "Patterns Format" appendix for more information about patterns.
Order: The order that the server follows to check if access is granted to a client according to its IP address. If it is set to Allow/Deny, access is denied by default and is allowed only if the client IP address is in the Allowed IP Addresses list and is not in the Denied IP Addresses list. If it is set to Deny/Allow, access is allowed by default and is denied only if the client IP address is in the Denied IP Addresses list and is not in the Allowed IP Addresses list.
Allowed IP Addresses: The list of IP addresses or IP address ranges for which access is allowed. Refer to the "IP Addresses and Ranges Format" appendix for more information about the IP addresses and ranges.
Denied IP Addresses: The list of IP addresses or IP address ranges for which access is denied. Refer to the "IP Addresses and Ranges Format" appendix for more information about the IP addresses and ranges.
Note: If Denied IP Addresses list is empty and the order is Deny/Allow, access is granted to any client.
URL Rewriting
To automatically redirect certain requests or rewrite their URL, select URL Rewriting in the host configuration menu.
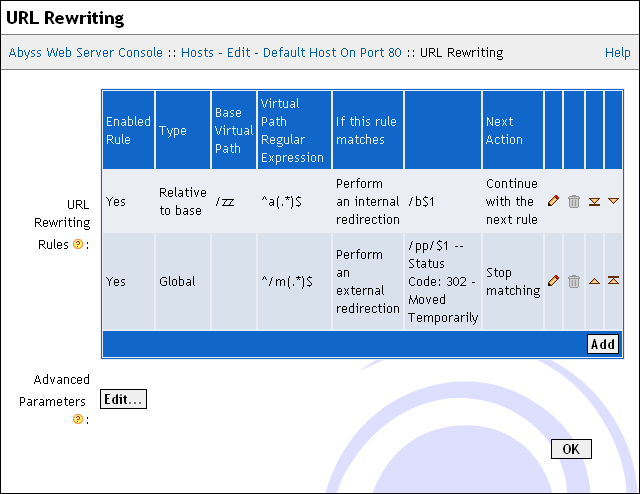
This dialog includes the following elements:
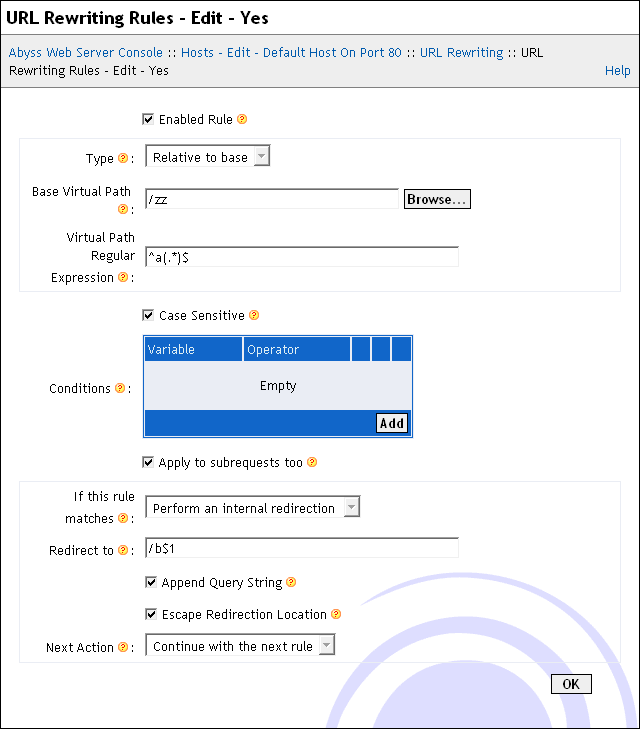
URL Rewriting Rules: Use this table to edit, remove or add URL rewriting rules. The URL rewriting rule definition dialog contains the following items:
Enabled Rule: Enable/disable the current URL rewriting rule.
Type: The rule can be Global or Relative (the paths will be defined relatively to a base path defined in the Base Virtual Path.)
Virtual Path Regular Expression: If Type is set to Global, the current URL rewriting rule will be examined for virtual paths which match with this regular expression. But if Type is set to Relative, the URL rewriting rule will only be applied for virtual paths which head equals Base Virtual Path and which tail matches with this regular expression. For more information about regular expressions syntax, see the "Regular Expressions" appendix.
Case Sensitive: The above regular expression is matched case sensitively if this option is checked. Otherwise, no difference between lower and upper cases is made while matching.
Conditions: If all the conditions in this table are verified (are true), the URL rewriting rule will apply. Otherwise, it is skipped and ignored. Each condition consists in a test of the value of a first operand with an operator and possibly a second operand. The first operand can be a single CGI variable or a string which contains normal text mixed with references to one or many CGI variables using the syntax ${VARIABLE}. Three kinds of operators are available: string operators (regular expression matching, and lexicographical ordering), numerical operators (numerical ordering), and file operators (is a file, is a directory, is not a file or is empty).
Apply to subrequests too: If checked, the rule is tested on subrequests too. Subrequests are requests that are internally generated by the server and not directly invoked by a client. For instance, XSSI include directives generate subrequests.
If the rule matches: The action to perform when the virtual path matches with the regular expression and when all the conditions are verified:
Perform an internal redirection: The server will continue the processing of the request as if the requested virtual path was the one that is specified in Redirect to. That virtual path could contain backreferences to the groups of the regular expression specified in Virtual Path Regular Expression. Occurrences of $1 are substituted with the backreference of the first group (if any), occurrences of $2 are substituted with the backreference of the second group (if any), and so on. Occurrences of %1, %2, ..., %9 are substituted with the backreferences of the groups (if any) of the last evaluated condition. For more information about backreferences, refer to the "Regular Expressions" appendix. Occurrences of %{VARIABLE} are substituted with the value of the CGI variable VARIABLE (see "CGI environment variables" in the "CGI, FastCGI, and ISAPI" chapter.) You also decide with Next Action if URL rewriting has to be stopped, restarted, or continued after the application of the current URL rewriting rule.
Perform an external redirection: The server will redirect the client to the URL or the virtual path set in Redirect to. That URL or virtual path could contain backreferences to the groups of the regular expression specified in Virtual Path Regular Expression. For more information about backreferences, refer to the "Regular Expressions" appendix. By default, the external redirection results in a HTTP response with a 302 status code but you can choose a more appropriate one by setting Status Code to another value between 300 and 399.
Report an error to the client: The server will report an error to the client. The Status Code of that error must be in the 400-999 range.
Abort connection: The server will abruptly abort the connection with the client without further processing. This action is not recommended as it breaks the HTTP protocol. It should only be used in a few special situations inside a set of rules aimed at banning bandwidth consuming bots or automated clients.
When a Redirect To field is available, the checkbox Append Query String is used to control the automatic addition of the original query string to the final redirected URL or virtual path. The original query string is the substring after the ? character in the original request URL. If Redirect To already contains a query string and if the original URL's query string is not empty, both are concatenated in the final URL or virtual path that the request will be redirected to.
The Escape Redirection Location option should be unchecked only when the Redirect To field contains a location which is already URL escaped.
Note that if Type is set to Relative and the virtual path resulting from the processing of Redirect to is relative (which means that it does not begin with /), the value of Base Virtual Path is prepended to it.
Advanced Parameters: Press Edit... to access the advanced parameters dialog of the current URL rewriting rule which contains the following elements:
Advanced Parameters: Press Edit... to access the advanced parameters dialog which contains the following elements:
Log File: The path of the file where the Abyss Web Server will log extensive debugging information about the processing of each request by the URL rewriting engine. The size of that file can become very huge very quickly as each request results in several dozen lines of logged debugging information. For that reason, it is recommended to turn it off on production servers.
Log variables: If checked, the CGI variables of each request are logged along with the URL rewriting processing details.
Compression
Compression is performed on any content (be it static or dynamically generated) provided that all the following conditions are satisfied:
The browser requesting the content claims support for HTTP decompression by including an Accept-Encoding header in the HTTP request;
The virtual path of the content belongs to the compression scope;
The MIME type of the content matches with one of the MIME types listed in the MIME Types table.
If one or more of the above conditions is not met, the current content is sent back to the browser uncompressed.
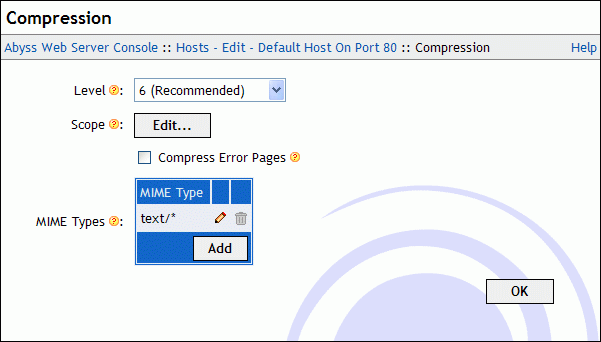
The Compression dialog contains the following elements:
Level: The compression level. It ranges from 1 (Minimum compression - Faster) to 9 (Maximum compression - Slower). If it is set to 0, compression is disabled.
Scope: Press Edit... to configure the virtual paths where compression is considered. The displayed dialog has the following items:
Order: The order that the server follows to check if compression is considered for a virtual path. If it is set to Allow/Deny, compression is denied by default and is allowed only if the virtual path is in the Allow for list and is not in the Deny for list. If it is set to Deny/Allow, compression is allowed by default and is denied only if the virtual path is in the Deny for list and is not in the Allow for list.
Allow for: The list of virtual paths for which compression is allowed. The table can contain also path patterns. See the "Patterns Format" appendix for more information about patterns.
Deny for: The list of virtual paths for which compression is denied. The table can contain also path patterns. See the "Patterns Format" appendix for more information about patterns.
Compress Error Pages: Enable/Disable compression of responses which status codes correspond to an error.
Compress Dynamically Generated Content When Served Over SSL/TLS: It has been demonstrated that without any prior keys knowledge, it is still possible in some scenarios to derive sensitive data by the observation by a man in the middle of encrypted compressed responses generated for variations of known requests. This class of attacks referred to as BREACH can safely be mitigated when using HTTPS by disabling compression of dynamically generated content, that is content which is output from XSSI pages, CGI scripts, or FastCGI interpreters for example. This parameter is disabled by default.
MIME Types: Compression is considered for contents which MIME types are equal or match with the listed MIME type patterns in this table. See the "Patterns Format" appendix for more information about patterns.
Bandwidth Limits
With Abyss Web Server, you can have fine control on the bandwidth every host uses. You can even control the bandwidth allowed for a particular file or script, or for the contents of a directory.
The Bandwidth Limits dialog has the following fields:
Enable Bandwidth Throttling: Enable/Disable bandwidth throttling for the current host.
Limits: This table contains the bandwidth limits that are configured for this host.
Each limit is defined by its:
Scope: This table contains the virtual paths for which this bandwidth limit applies. A virtual path must begin with a slash /. It can also be a path patterns. In such a case, the limit applies for any virtual path that matches with the specified pattern. Refer to the "Patterns Format" appendix for more information about patterns.
Maximum Bandwidth: The amount of output bandwidth that the host should not exceed for all the requests which virtual path matches with one of paths listed in the Scope table. If set to Unlimited, no such bandwidth restriction will apply.
Maximum Bandwidth Per IP Address: The total amount of output bandwidth that the host should not exceed for all the requests made by a single IP address and which virtual path matches with one of paths listed in the Scope table. If this parameter is set to Unlimited, no limit will be applied.
Maximum Requests Per IP Address: The maximum number of simultaneous requests made by a single IP address to the host and which virtual path matches with one of paths listed in the Scope table. No limit will ever be applied if this parameter is set to Unlimited.
Note: To set a limit on the bandwidth of the whole host, add a bandwidth limit with / as its scope.
Note: If the virtual path of a request matches with more than a single bandwidth limit, Abyss Web Server will respect all of them.
Logging
Select Logging in the host configuration menu to display the Logging options.
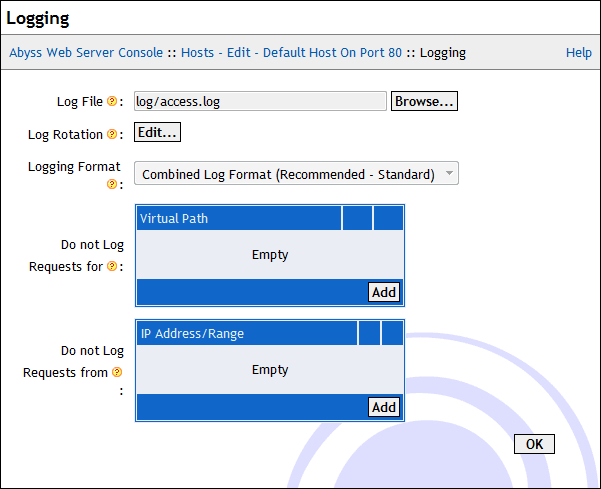
The dialog contains the following fields:
Log File: The path of the log file. If it is relative, it is considered as a subpath of the server root. If empty, logging is disabled.
Log Rotation: To prevent the log file from growing indefinitely, press Edit... to configure the way it is rotated:
Rotation can occur when the size of the log file reaches a certain threshold set in Maximum Log Size Before Rotation. The rotated files are then stored in the directory set in Rotated Files Path. Rotated file names are made of the concatenation of the value in Rotated File Names Prefix and an ordinal number. The last rotated file has number 0. The previous one has number 1, the so forth.The maximum number of preserved rotated files is set in Maximum Number of Retained Rotated Files .
Rotation is time based when Type is set to By Time. Use Rotation Frequency to set when rotation should occur. If Use Local Time is unchecked, the clock is converted to UTC/GMT to determine if a period of time relative to the frequency lapsed and rotation has to happen or not. The rotated files are then stored in the directory set in Rotated Files Path. Rotated file names are made of the concatenation of the value in Rotated File Names Prefix and a time reference which depends on the value of Rotation Frequency. For example, if rotation is on yearly basis, the time reference is the year only YYYY. If the rotation is on a hourly basis, the time reference is of the form HH-DD-MM-YYYY.
Logging Format: This parameter sets the format to be used in the log file for the current host. It offers the choice between the standard formats Common Log Format or the Combined Log Format, and the custom logging formats defined under the Logging Parameter dialog in Server Configuration.
Do not Log Requests for: This table contains the virtual paths for which logging is disabled. A virtual path must begin with a slash /. It can also be a path patterns. In such a case, the logging is disabled for any virtual path that matches with the specified pattern. Refer to the "Patterns Format" appendix for more information about patterns.
Do not Log Requests from: This table contains the IP addresses or IP address ranges for which logging is disabled. Refer to the "IP Addresses and Ranges Format" appendix for more information about the IP addresses and ranges.
Reverse Proxy
Abyss Web Server can act as a reverse proxy to provide content transparently from another Web server behind it (commonly called a back-end server.) The proxied server can be another Web server or an application server with a restricted or even a trivial HTTP support that has to be shielded from external clients. Reverse proxying is also the recommended way to take advantage of JSP (Java Servlet Pages) and Tomcat Web applications.
Abyss Web Server automatically selects the best version of the HTTP protocol when communicating with a back-end server. It is also able to keep-alive connections with HTTP/1.1 back-end servers and sharing pools of connections between several requests and hosts. It also transparently supports the HTTP/1.1 Upgrade mechanism which allows it to relay WebSockets connections out-of-the-box. Abyss Web Server may instruct the client to downgrade from HTTP/2 to HTTP/1.1 if the back-end server is trying to use a HTTP/1.1 feature that cannot be proxied over HTTP/2.
Select Reverse Proxy in the host configuration menu to display a dialog containing the Reverse Proxy Rules table. Use that table to to edit, remove or add reverse proxy mapping rules rewriting rules.
Each reverse proxy mapping rule is defined by the following parameters:
Local Virtual Path: The local virtual path on the current host which contents will be mapped to the remote virtual path on the reverse proxy.
Remote Host: The host name or IP address of the back-end server.
Remote Port: The port on which the Web server is listening on the back-end server.
Remote Virtual Path: The virtual path on the remote host from which mapped contents are served.
HTTPS: If checked, connect to the remote host using HTTPS instead of plain HTTP.
Advanced Parameters: Press Edit... to access the advanced parameters dialog. This dialog exposes the following fields:
Fix URLs in Cookies: If checked, HTTP Cookies received from the back-end are rewritten to appear as if they were originated from the current host.
Fix URLs in Location Response Headers: If checked, the Location, Content-Location, and URI HTTP headers received from the back-end are rewritten to appear as if they were originated from the current host.
Preserve Host Header: If checked, the Host header of the original request is preserved and used in the request sent to the back-end server instead of the value of Remote Host. Some back-ends can use this feature to correctly generate links and redirection headers. Please note that Preserve Host Header should remain unchecked unless you are sure the back-end can deal with such altered requests.
Extra Request Headers: The HTTP headers defined in this table are added to each request targeting the the back-end.
Timeout: The timeout value in seconds is used to determine how long to wait for an inactive connection to the back-end before closing it.
WebSocket and Post-Protocol Switch Timeout: If the back-end responds with status code 101 and switches the protocol, the current connection will act as a full-duplex tunnel and will use the value of this parameter as its timeout for both reading and writing. The rationale is that reverse-proxying the HTTP protocol with its request/response operational model is different from full-duplex protocols such as WebSocket which may require long-lived connections, and hence a different timeout before closing an idle tunnel.
Connection Timeout: The connection timeout value in seconds determines how long to wait for a connection to the back-end to be established.
Example 5-4. An example of a reverse proxy rule
Let's assume that the current host includes a reverse proxy rule defined with the following parameters:
Local Virtual Path: /app/photo
Remote IP Address: 192.168.1.233
Remote Port: 8080
Remote Virtual Path: /txp
Restricted Downloads Areas
To prevent direct access to files contained in some directories, it is possible to create links to them which expire after a certain duration and which may be restricted to a certain IP address. Such links are to be generated using scripts and look like:
http://www.mysite.com/dir1/dir2/1d0dc35b10df59a45638a78228fdfe4d/5183d1da/file.txt
To configure virtual paths associated with such a behavior, select Restricted Downloads Areas in the host configuration menu. Each restricted downloads area is defined by the following parameters:
Virtual Path: The virtual path associated with the restricted downloads area. This virtual path will be prepended to all URLs referring to that area.
Files Root Path: The real directory which contains the files that are served from that area.
Secret String: The secret string which is used to compute the hash included in the URL.
Timeout: The maximum duration of validity of URLs referring to files in that area (in seconds.)
Limit To Originating IP: If checked, the hash should be generated including the originating IP address and validity of URLs in that area takes into account that information.
An URL referring to a restricted download area is of the form: http://<your host name>:<host port>/vpath/hash/hextimestamp/file.ext:
/vpath is the virtual path associated with the area.
hextimestamp is the hexadecimal representation of the number of seconds since January 1st, 1970 GMT. The timestamp is used to determine if the link is still valid based on the Timeout value.
file.ext is the path of the file inside the Files Root Path.
hash is a hexadecimal string which is the value of MD5(secret + "/file.ext" + hextimestamp) if Limit To Originating IP is unchecked. Otherwise, it is the value of MD5(secret + "/file.ext" + hextimestamp + ip) where ip is the IP of the client.
Example 5-5. Script to generate a restricted download URL (PHP version)
   <HTML>
     <HEAD>
       <META HTTP-EQUIV="Content-Type" CONTENT="text/html; charset=utf-8">
       <TITLE>
           Test
       </TITLE>
     </HEAD>

     <BODY>

   	<?php

   		$secret_string = "secret string";
   		$virtual_path = "/downloads/";
   		$limit_by_ip = false;
   		$hex_timestamp = dechex(time());
   		$file_name = "/file_to_protect.txt";

   		if ($limit_by_ip) {
   			$t = $secret_string . $file_name . $hex_timestamp . $_SERVER['REMOTE_ADDR'];
   		}
   		else {
   			$t = $secret_string . $file_name . $hex_timestamp;
   		}

   		$hash = md5(mb_convert_encoding($t, "UTF-8"));
   		$url = $virtual_path . $hash . "/" . $hex_timestamp . $file_name;

   		echo "<TR><TD><A HREF=\"$url\">Click here to download the file</A>";
   	?>

      </BODY>
   </HTML>
Example 5-6. Script to generate a restricted download URL (Python version)
   import os, time, hashlib

   secret_string = "secret string"
   virtual_path = "/downloads/"
   limit_by_ip = False
   hex_timestamp = "{0:x}".format(int(time.time()))
   file_name = "/file_to_protect.txt"

   if limit_by_ip:
     t = secret_string + file_name + hex_timestamp + os.environ["REMOTE_ADDR"]
   else:
     t = secret_string + file_name + hex_timestamp

   hash = hashlib.md5(t.encode('utf-8')).hexdigest()
   url = virtual_path + hash + "/" + hex_timestamp + file_name

   # Output CGI headers
   print ("Content-Type : text/html")
   print ()

   # Output body
   print ('<HTML><BODY><A SRC="%s">Click here to download the file</A></BODY></HTML>' % url)
Anti-Leeching
Anti-Leeching is a system that prevents web pages not belonging to your host from referring or linking to materials available in your web site. Leeching is also known as cross-site linking.
When a request is sent to the host, and if its virtual path is in the configured Anti-Leeching Scope, the server checks if the Referer header in the request matches with the current host or with one of the host names or the patterns in the Allow Links from table. The Referer header is usually set by the browser to indicate to the server from which web page the current URL was requested (or linked to.) If it does not match, the request is considered as a leeching attempt and is redirected to the URL configured in the Redirect Leechers to URL parameter.

The dialog contains the following fields:
Anti-Leeching Scope: Any request which virtual path is in or matches with one of listed virtual paths in this table is protected against leeching.
Redirect Leechers to URL: A request that is considered as a leeching request is redirected to this URL. It can be a full URL referencing another web site or a virtual path pointing on a document in the current host. If this field is empty, the server returns error 403 to the client.
Refuse Requests with no "Referer" Header: If checked, the system adopts a strict behavior and will consider requests that do not contain a Referer header as anti-leeching requests. It is not recommended to check this parameter since it may prevent browsers configured to not send the Referer header from viewing documents in your host.
Allow Links from: This table contains the names of hosts that are allowed to link to files and materials in the current host and that are not monitored against leeching. A host name in this table can also be a pattern such as *.mysite.com. Refer to the "Patterns Format" appendix for more information about patterns.
Statistics
The Statistics dialog displays a set of statistics on the host's activity since the server installation or the last host statistics reset:
Uptime since Last Restart: The time during which the host was up since the last server start or restart. If the host is stopped, its value is zero.
Total Hits: The total number of requests processed by the current host.
Compressed Hits: The number of requests processed by the current host that resulted in compressed responses.
Error Hits: The number of requests targeting the current host that resulted in an error.
HTML Hits: The number of requests the host replied to by a document which MIME type was text/html.
Image Hits: The number of requests the host replied to by a document which MIME type starts with image/.
Not Modified Hits: The number of requests for which the host detected that the requested document has not changed.
Transferred Data: The total size of the payload sent by the current host to the clients.
Compression Savings: The amount of data that was saved thanks to the compressed responses sent by the current host to the clients.
The host statistics are refreshed automatically every 10 seconds. You can also press Refresh for immediate refreshing. They can be reset by pressing Reset.
Note: The statistics are preserved when the server is shut down or when the host is stopped.
Note: The host statistics are also available in real time to scripts and XSSI pages. Refer to "CGI environment variables" for more information.