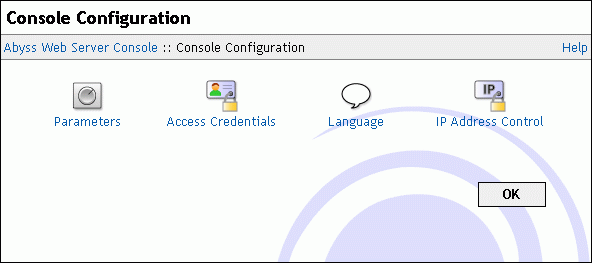
Console Configuration
To change the console parameters, open the console and select Console Configuration.
Changing the console port and protocol
In the Console Configuration dialog, select Parameters. In the displayed dialog, Protocol can be set to HTTP or HTTPS. If HTTPS is selected, the console will be accessible through secure connections using SSL/TLS and you will have to set Certificate to the name of the certificate you want to use for console accesses. A certificate that will be used for the console can be a self-signed certificate and it is recommended to set its Host Name (Common Name) to * to have it match with any host name you may use when accessing the console.
You can also choose a new port number that will be used for the console in the Port field. Press OK to validate the changes.
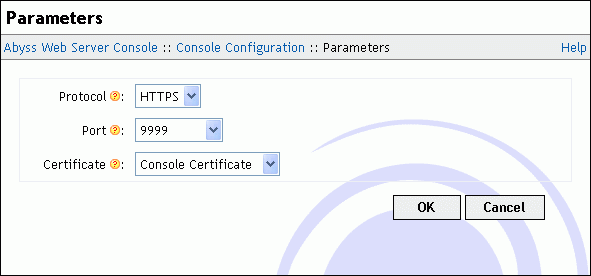
If the port number is invalid or is already used by another application on your computer, the console displays an error and asks you to enter another value.
Advanced configuration options of the console can be accessed by pressing Edit... next to Advanced Parameters. The advanced parameters dialog contains the following fields:
Bind to IP Address: The IP address of the network interface that the console should listen on. When empty or set to *, the host listens for incoming connections on all available network interfaces (which is the default and the recommended setting.)
SSL/TLS Parameters: Detailed parameters of the SSL/TLS secure layer are accessible by pressing Edit....
The displayed dialog makes the SSL/TLS profile selection possible. But it is highly recommended to let the profile set to its default and recommended value.
If the profile is set to Modern, only strong ciphers and TLS 1.3 will be accepted. Selecting this profile will restrict access to modern browsers and clients which support TLS 1.3.
If the profile is set to Standard, only modern ciphers with no known issues and both TLS 1.2 and 1.3 will be accepted. The Standard profile offers a good balance between security and reach. It will only disable access for legacy browsers and clients including Internet Explorer 10 and its previous versions which are already deprecated.
If you set the profile to Custom, it becomes possible to select the accepted protocols and configure the Ciphers parameter to select the ciphers that the server can accept to use when negotiating with a browser establishing a HTTPS connection to the console.
When the profile is set to Strong, no weak cipher (any cipher with a key length strictly less than 128 bits) will be used. But this can restrict access from old browsers which do not support modern and strong ciphers.
It is also possible to allow the console to accept clear text http:// requests on the same port that was configured for https://. This can be useful to redirect clients which use the wrong protocol on the right port. The feature is controlled by the value of Accept receiving clear text HTTP/1.x requests on SSL/TLS port. It is turned on by default for the console.
For custom ciphers specification, set this parameter to Custom Specification and fill the displayed text field with a string conforming to the OpenSSL Ciphers List Format.
HTTP/2 Parameters: HTTP/2 support in the console can be configured by pressing Edit.... The displayed dialog has the following fields:
Changing the console access credentials
Because the console access needs authorization, it is important to keep your console access credentials secret. It is also highly recommended not to choose them similar to your system login or password or any valuable credentials. Indeed, as the console relies on the browser to perform the authorization and as browsers use a relatively weak authorization scheme, console access information could be intercepted and deciphered by malicious persons on the network.
To change the console access credentials:
Go to the Console Configuration dialog and select Access Credentials.
Enter an administrator login.
Enter a password. It is recommended to choose a password containing characters, digits, and special symbols. This password should not be a dictionary word.
Reenter the same password.
Press OK.
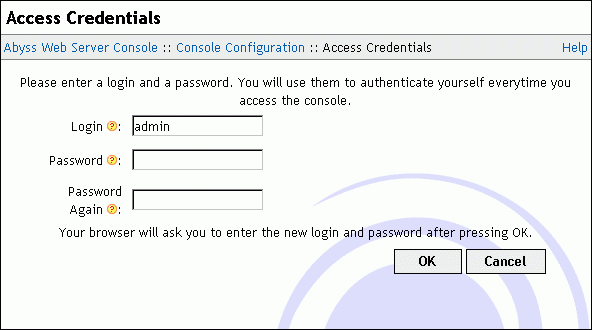
Once the change is made, the browser asks you to enter the new login and password. The console login is case-insensitive: you can authenticate using lowercase characters a...z instead of their uppercase counterparts A...Z and vice versa.
Changing the language
To change the language used in the console:
Go to the Console Configuration dialog and select Language.
Select a language by pressing one of displayed buttons.
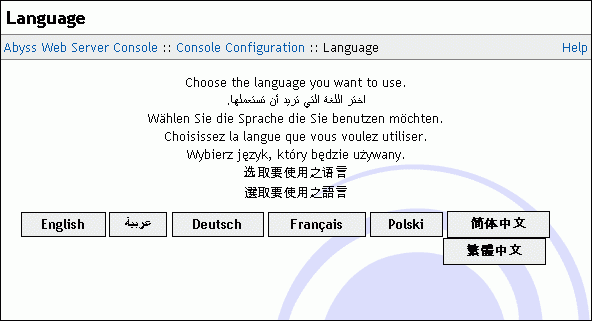
To add support for an additional language, download the corresponding language file from https://aprelium.com/abyssws/languages and save it inside <Abyss Web Server directory>/lang. You may need to restart the server to have it take into account the new language file.
Controlling the access to the console
To restrict or grant access to the console to an IP address or an IP address range, go to the Console Configuration dialog and select IP Address Control.
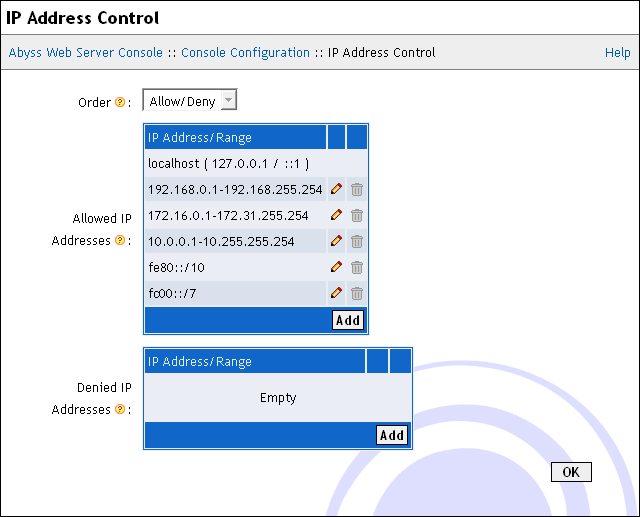
The displayed dialog contains the following items:
Order: The order that the server follows to check if access is granted to a client based on its IP address. If it is set to Allow/Deny, access is denied by default and is allowed only if the IP address is in the Allow for list and is not in the Deny for list. If it is set to Deny/Allow, access is allowed by default and is denied only if the IP address is in the Deny for list and is not in the Allow for list.
Allowed IP Addresses: The list of IP addresses and IP address ranges for which access is allowed. Refer to "IP Addresses and Ranges Format" appendix for more information about the IP addresses and ranges.
Denied IP Addresses: The list of IP addresses and IP address ranges for which access is denied. Refer to "IP Addresses and Ranges Format" appendix for more information about the IP addresses and ranges.
Note: The access to the console is always allowed for the computer on which Abyss Web Server runs (which IPv4 address is 127.0.0.1 and IPv6 address is ::1.)
Note: If Denied IP Addresses list is empty and the order is Deny/Allow, access is granted to any IP address.